
How to create Rain in Unreal Engine 4 Niagara
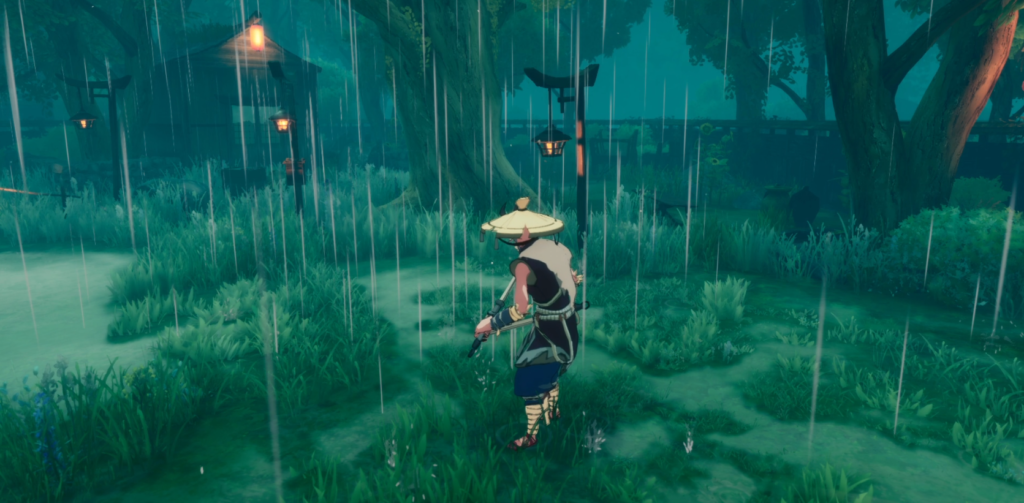
Some of you asked us how we create the rain effect in Rogue Spirit. It’s a really simple effect to create. (btw we have a free demo which you can play and see the effect by yourself)
Raindrops
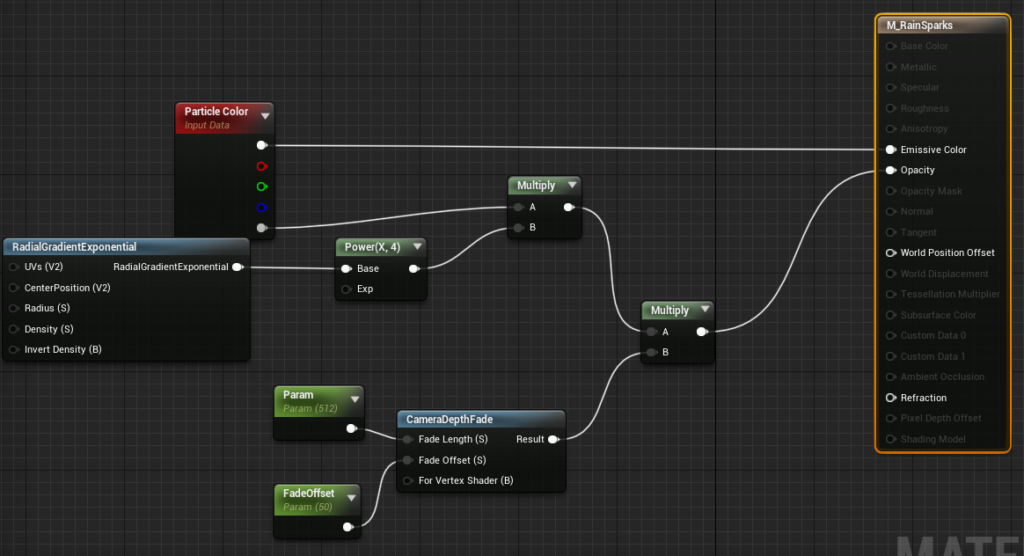
First, let’s start by creating simple Material for raindrops.
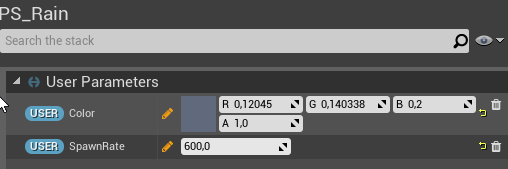
Then create a new Niagara System, and make sure you have added those user parameters:
- Color (LinearColor)
- SpawnRate (float)
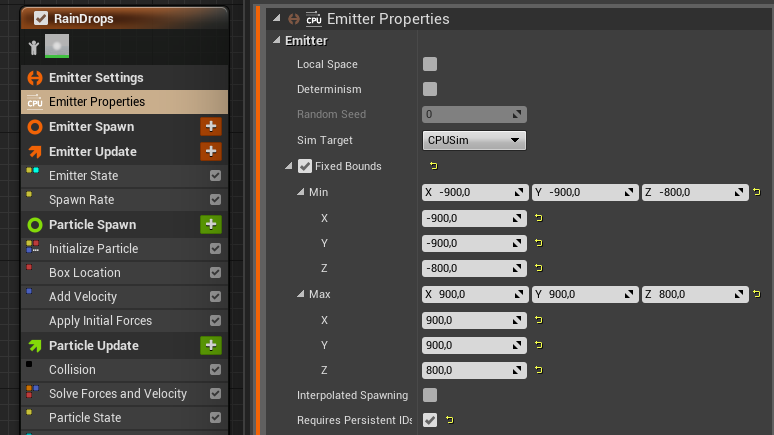
Create an empty emitter with those modules:
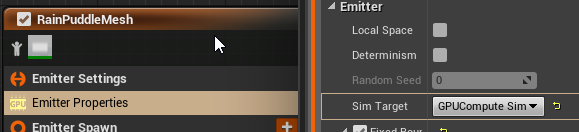
Emitter Properties
- We are using CPU simulation as we need collisions to make the splashes. If you don’t want to have splashes it would be much faster to use GPU Sim without a Collision module.
- Make sure you have fixed bounds – as this emitter is spawning a lot of particles, we don’t want to recalculate the bounds on the tick. Basically, all of your emitters should have fixed bounds in place!
Emitter State
This one is easy: we are using System settings here without any changes.
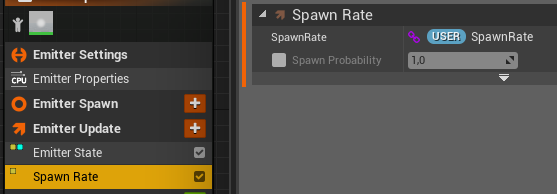
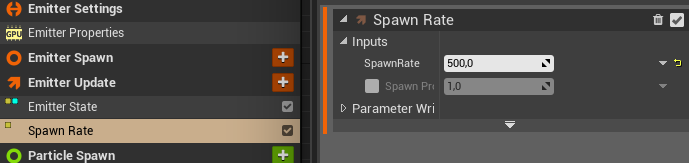
Spawn Rate
Make sure you applied SpawnRate from User.SpawnRate parameter. Thanks to this you will be able to increase/decrease the rain intensity during the game.
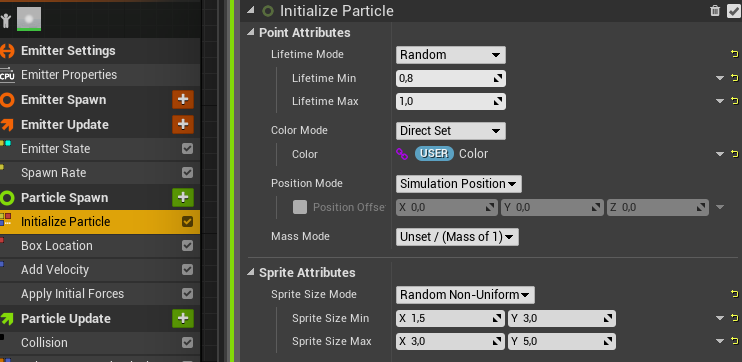
Initialize Particle
- Lifetime is random,
- Color is set from the system user parameter. So you can change the color during in-game, (for example different levels can use a different colors)
- Sprite size is random,
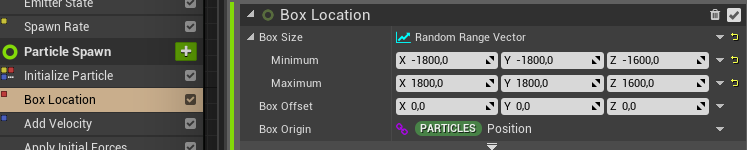
Box Location
This one is important as we will attach the system to the player. Spawn location matters here. Rogue Spirit is a third-person game and for us, those values work. But for your game, you should double-check if the Box Radius is too big or too small.
Add Velocity
We are adding velocity directly after the spawning particle. If your game is supporting directional wind you can add wind vector here. Our suggestion would be to use a wind vector as a system parameter so your wind manager can drive this value.

Apply Initial Forces
When changing velocity in Particle Spawn you need to update forces using Apply Initial Forces. If you won’t have this module your particle won’t move as the forces weren’t initialized.
(Update: fellow experienced VFX Artist just told us that you don’t need to Apply Initial Forces when changing Velocity. It should be added only if you are doing forces. Thanks!)
Now let’s move to the Particle Update part.
Collision
This module is most important here. As we need to know where and when to spawn rain splashes. If you don’t need rain splashes you can disable this module as it’s the most expensive module in this emitter.
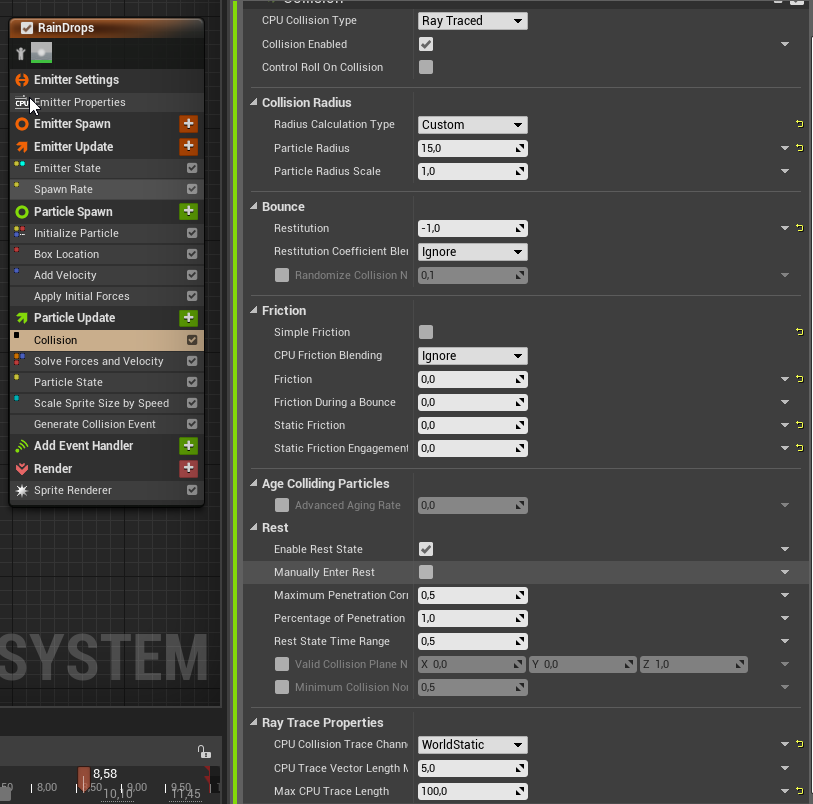
Another thing is that you can use GPU Collisions just to destroy the particles. It depends on your game and what you are trying to achieve.
Particle State
The particle state is here to make sure particles with a lifetime elapsed will be killed. So they won’t be updating after that.
Solve Forces And Velocity
When you are using AddVelocity or other Modules that change particle velocity somehow (vortex, noise etc) you need to have Solve Forces and Velocity module which will update all necessary math.
Scale Sprite Size by Speed
This one is really minor – just to have some size variation. Another thing is that we are changing the rain speed during the game that’s why it’s in the update. Your game can just make the size random on Particle Spawn and it will be more optimal.

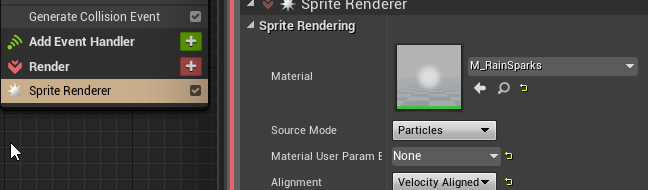
Generate Collision Event
We want to create rain splashes based on collision so we need to know when collisions will occur. Niagara has a Collision Event module which then can be used in other Emitters. You will see how it works in just a minute 🙂
If your rain doesn’t need any splashes you can disable this module.
Sprite Renderer
We are using earlier created material and making sure it’s aligned by Velocity. So our wind and initial velocity will works as intended.
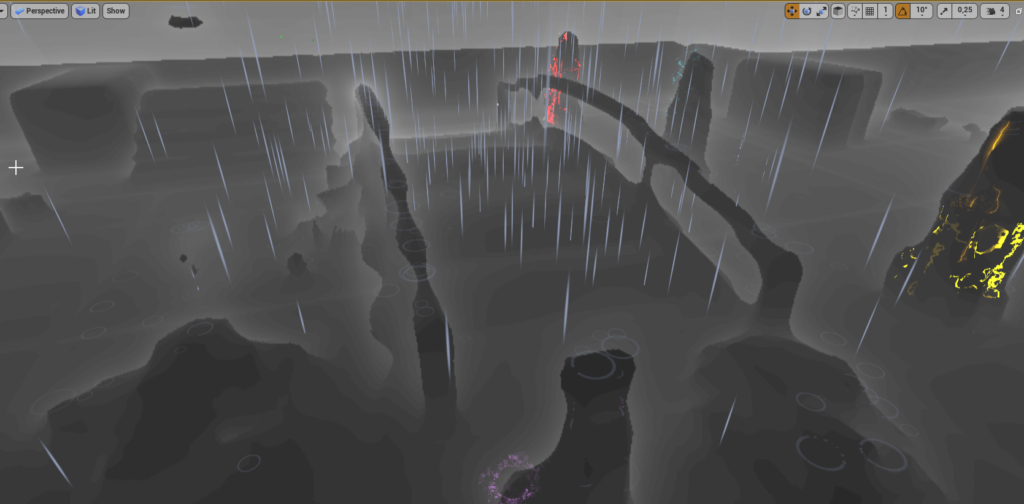
At this stage, you should have raindrops visible. Pretty easy!
Rain Splashes
Now let’s move to the splashes.
First Emitter – SM_Splash
You will need a splat mesh like this. It doesn’t need many verticles. The idea here is to just scale this mesh up on X/Y axis.
As for the material, it’s a really simple unlit material with translucent opacity. You don’t really need the texture sample over there as it’s barely visible on the mesh.

Now create a new empty emitter. Here’s mine and I will go with each module that is changed.
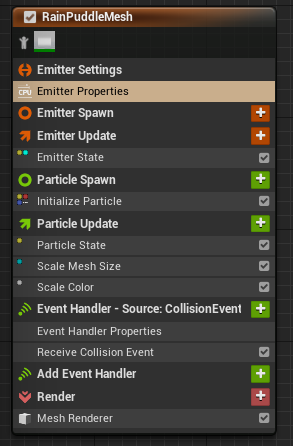
Emitter Properties – just remember to use Fixed Bounds.
Emitter State – using System
Particle State – using defaults
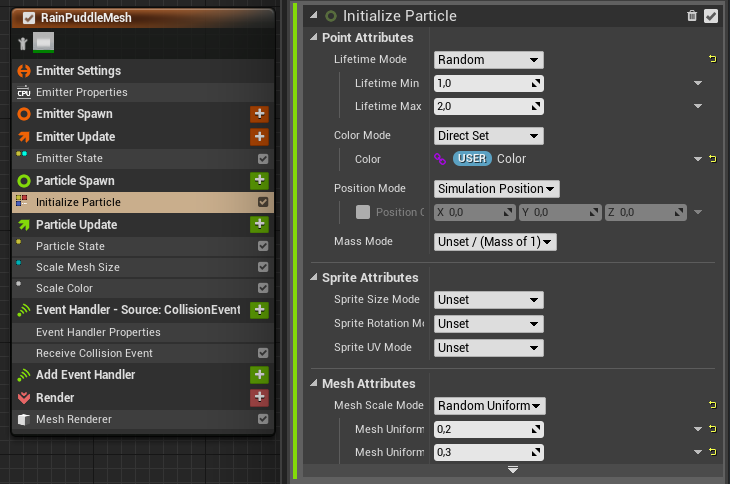
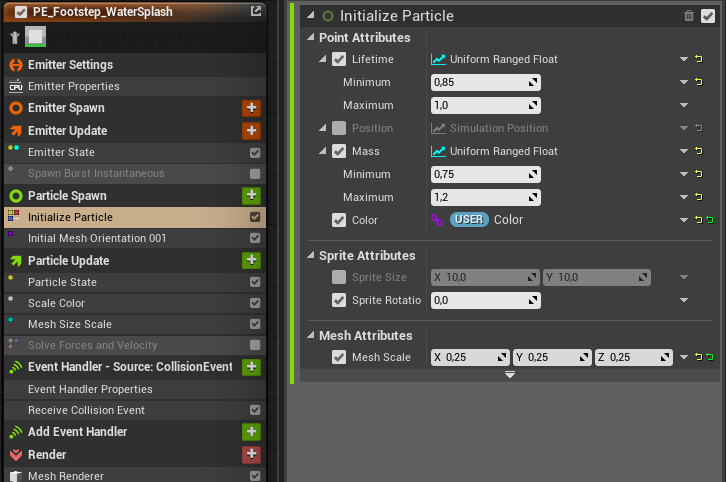
Initialize Particle
- Lifetime is random,
- We are using color from the system parameters,
- Mesh scale mode is random as well,
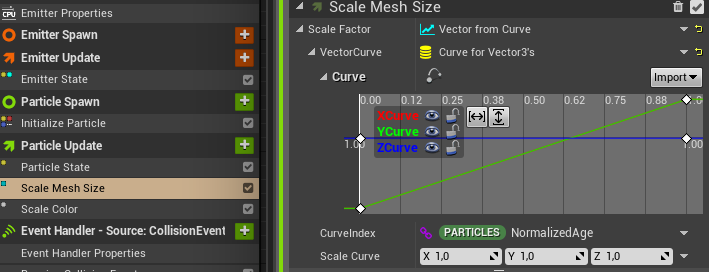
Scale Mesh Size
We want to scale mesh size during its lifetime. We are scaling only X/Y with the age. From 0 to 2.
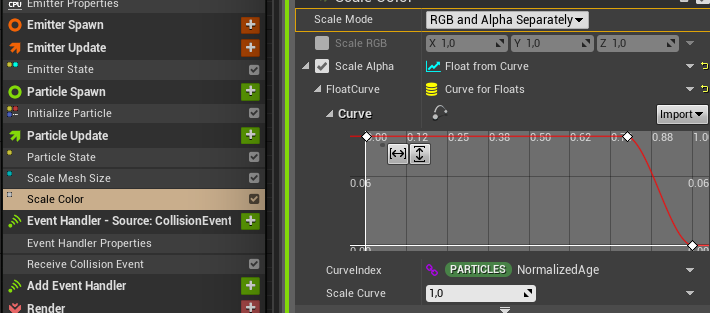
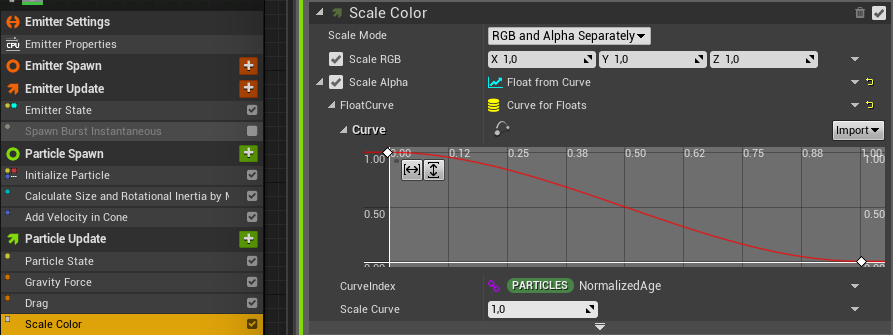
Scale Color
Splat should fade during its lifetime. To do this we are handling particle alpha.
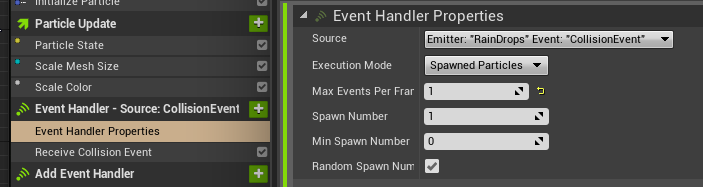
Event Handler and Receive Collision Event
We want this splat to appear on collision. To do that your emitter needs to react to the first Rain Drops Collision Event. We are randomly spawning 0 or 1 particle here as we want some variety with another splat that will have a different mesh.
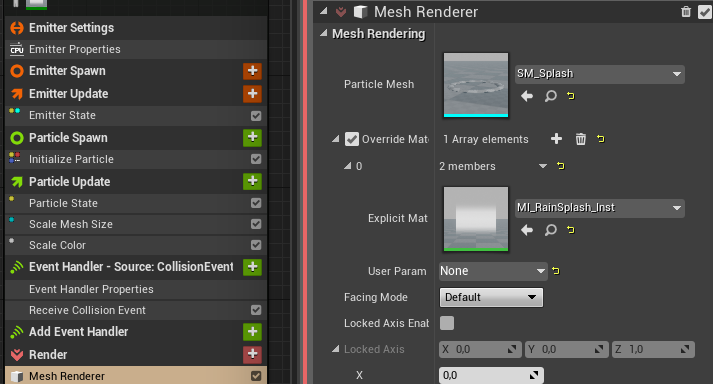
Mesh Renderer
And finally, Mesh Renderer where we are configuring our mesh. Just setting the mesh and the material. Easy.
And that’s it for this emitter. Just a simple mesh scaling emitter which will spawn on collision event from the previous emitter.
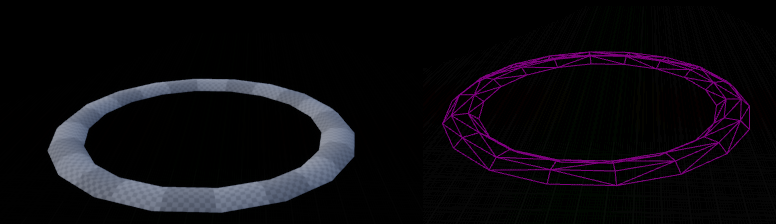
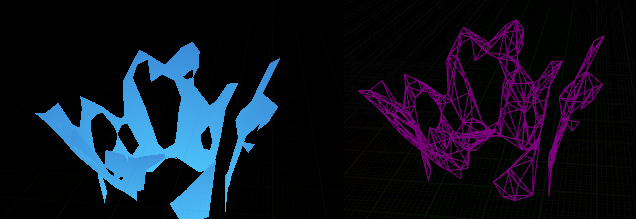
Second Emitter – SM_SplashMesh_02
The second emitter is different and requires more preparation. First, you need some splash mesh, something like this.
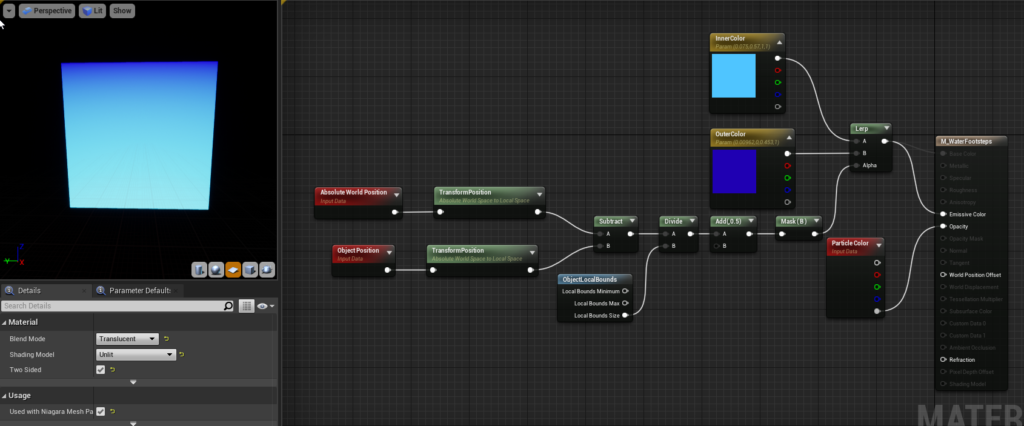
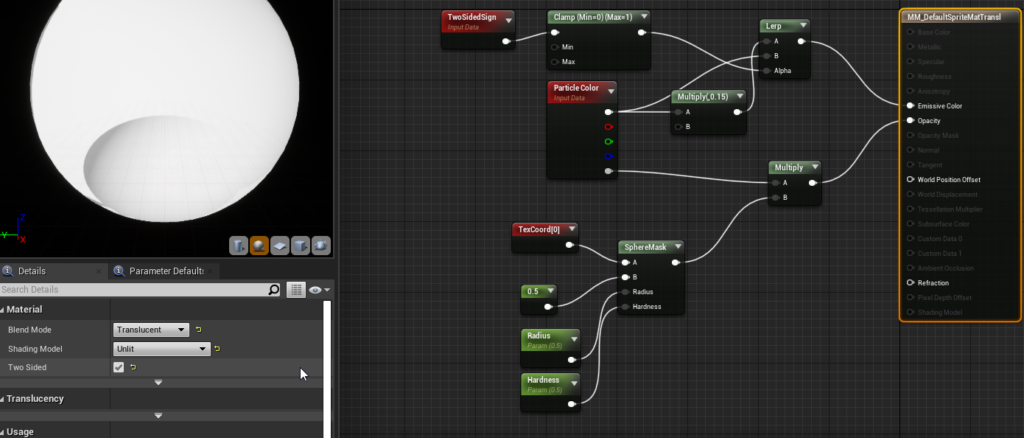
The material here is more advanced to create a more stylized look.
Now create another empty emitter. Here’s mine and again I will go with each module that is changed.
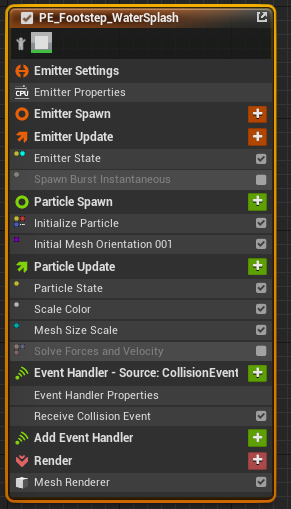
- Emitter Properties – make sure you have fixed bounds,
- Emitter State – using System
- Spawn Burst is not needed here,
- Particle State – default
- Solve Forces and Velocity is not needed here,
Initialize Particle
Again lifetime is random, color is picked from the system parameters and mesh scale can be random here.
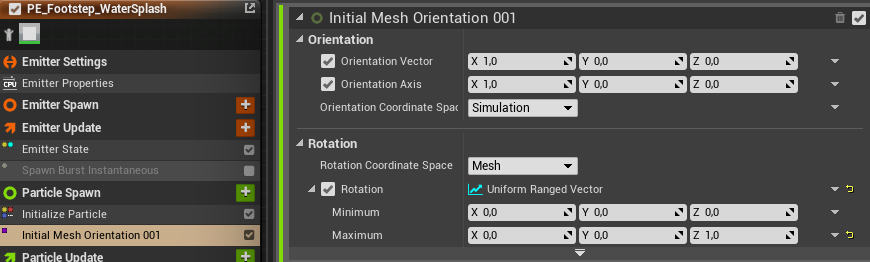
Initial Mesh Orientation
We always want to have this splat oriented to Z axis with random X rotation so it will always look different.
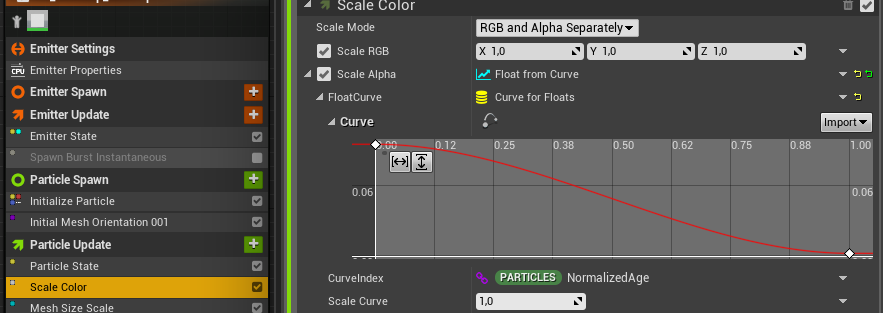
Scale Color
As in the first splat, we want the mesh to fade with time.
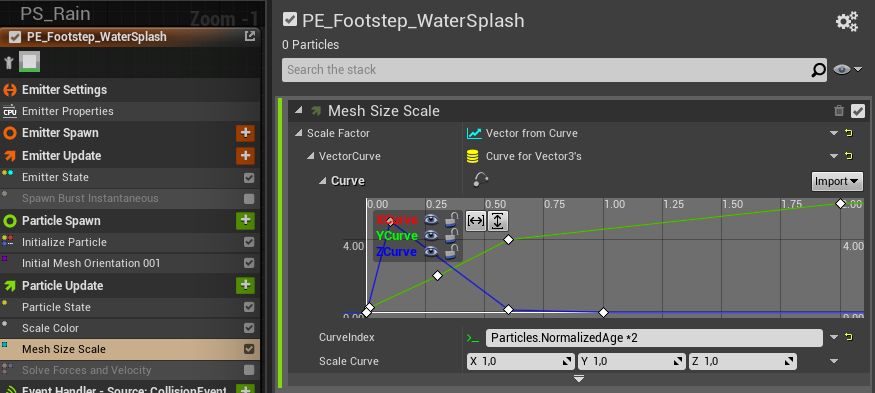
Mesh Size Scale
This one is important as it’s doing the whole “splat” animation on the mesh. You can see it’s using NormalizedAge multiplied by 2 as an index. This way you can easily scale your curve without messing with all of the keys. (it’s not so easy to iterate vector keys)
What this animation do is scale the mesh quickly up and down and slowly scale X/Y.
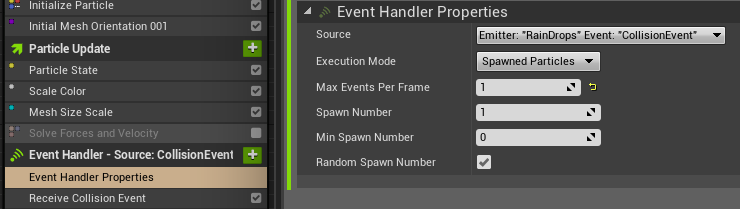
Event Handler and Receive Collision Event
It’s exactly the same as in the previous splat. Spawning on collision from 0 to 1 randomly.
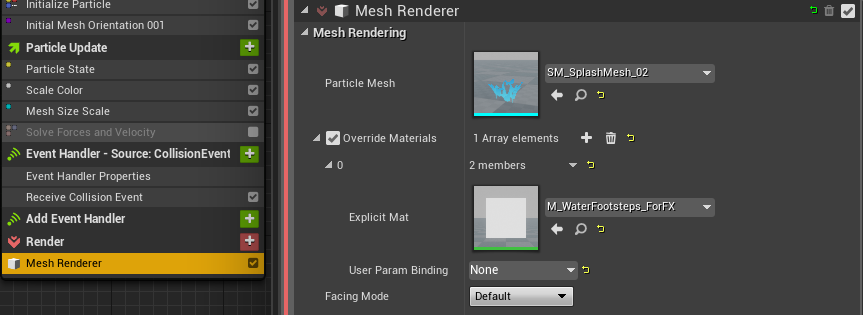
Mesh Renderer
Like in the previous splat we need to select our mesh and material.
And that’s it. Now you have two splats on collision, picked randomly.
Water Dips
Now what’s missing is some dips which will also spawn on raindrop collision.
The material here is really simple, and it’s our master for translucent FX materials.
Now create another empty emitter and let’s go step by step by the properties.
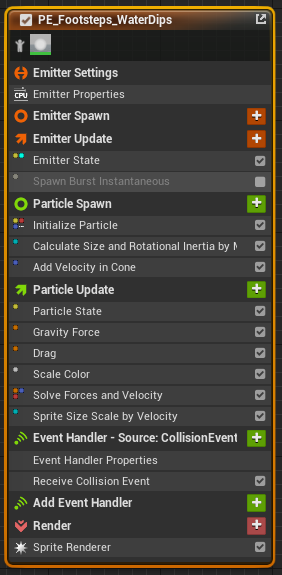
- Emitter Properties – make sure your have proper fixed bounds,
- Emitter State – using System,
- Particle State – default,
- Solve Forces and Velocity – default,
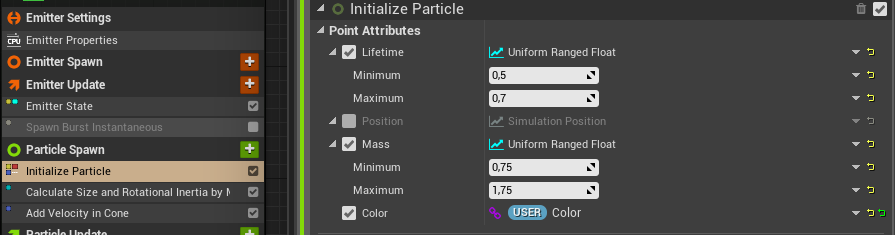
Initialize Particle
Lifetime is random, mass is random and the color is picked from the user parameter.
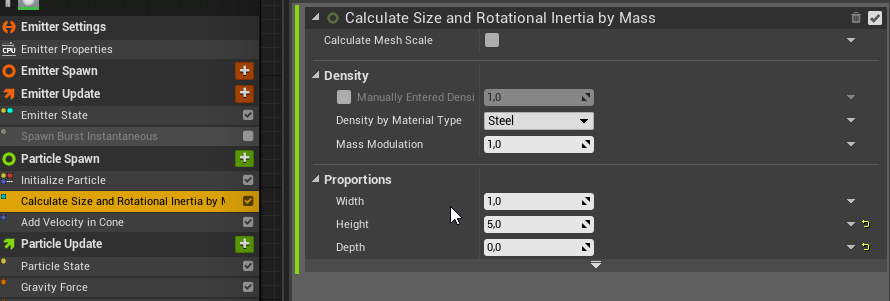
Calculate Size and Rotational Interia by Mass
We are using mass to decide what will be the size and rotation. You can use random size in Initialize Particles but this will make your results more “physical”. And we want to have the dips realistic. (btw you can tweak the values for example Density)
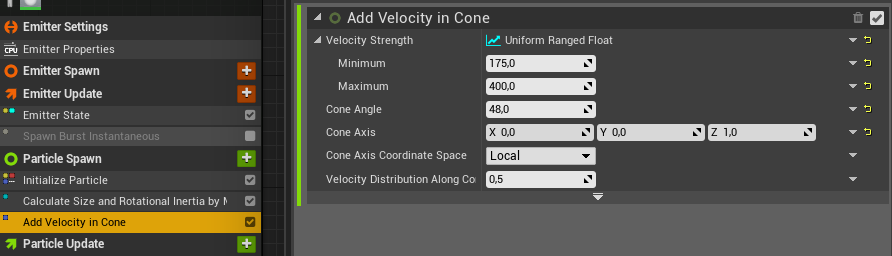
Add Velocity in Cone
This module is really handy if you want to add velocity with a randomly distributed direction. Velocity strength is random and direction is up (Z axis).
Gravity Force
We are using physics math here so gravity force should add life to the particles and they won’t go up that much. (and of course, go down 😉 ) For us the details are defaults.
Drag
We want some drag to the movement which will slow down particles. Using default value 1.0.
Scale Color
As always – we want the dip to fade during its lifetime. Again we are using Alpha Scale by age. Our material has a Particle Color node which is used by Niagara to control emitter material.
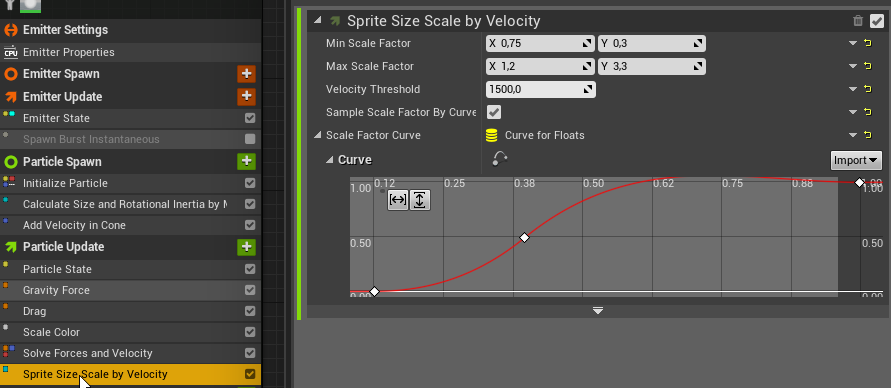
Sprite Size Scale by Velocity
We do want our dips to be smaller/bigger depends on the velocity.
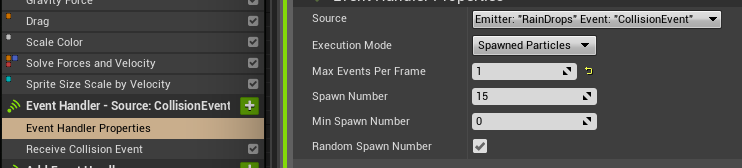
Event Handler and Receive Collision Event
Dips will spawn on drops collision as earlier emitters. The spawn number will differ as we want more dips than one 😉
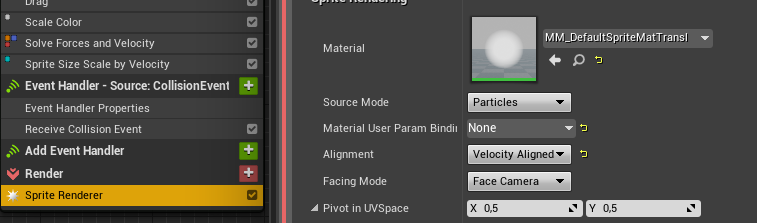
Sprite Renderer
Assign the material and make sure its Velocity Aligned.
And that’s all for the dips.
Wet decals
In Niagara, you can spawn components – which is an experimental feature and it shouldn’t be used by games yet. But we want to show you how this can be achieved. Maybe you can use such decals in cinematics.
Create another empty emitter and I will go from bottom now.
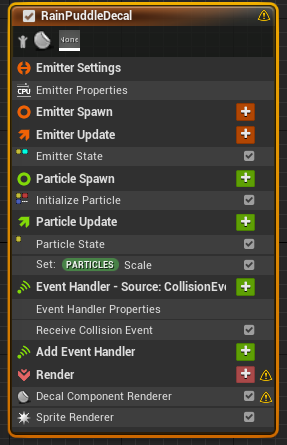
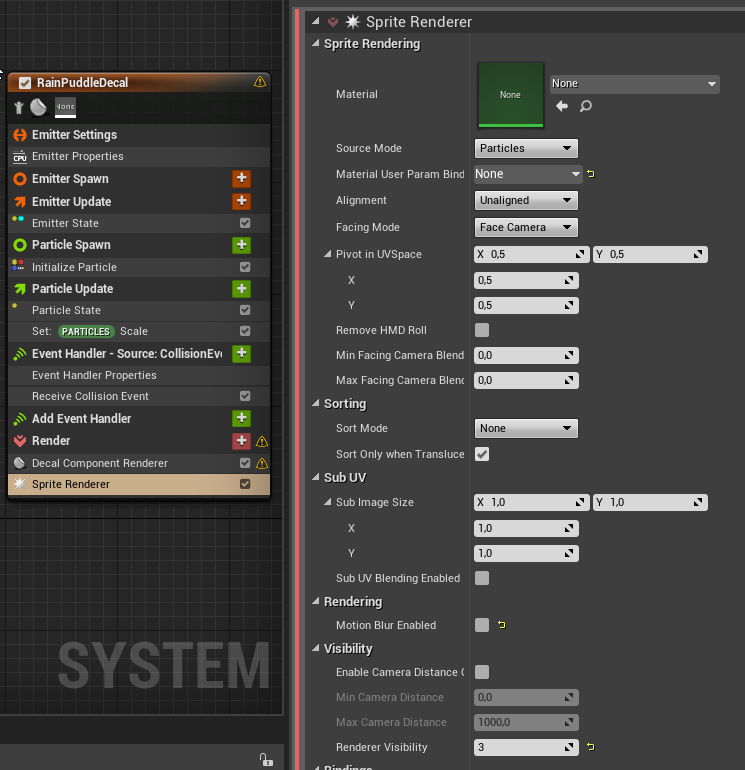
Sprite Renderer
At this stage of Niagara (4.26) you need an empty sprite renderer to properly draw Decal Components. We had some issues with spawning them but those settings are working for us.
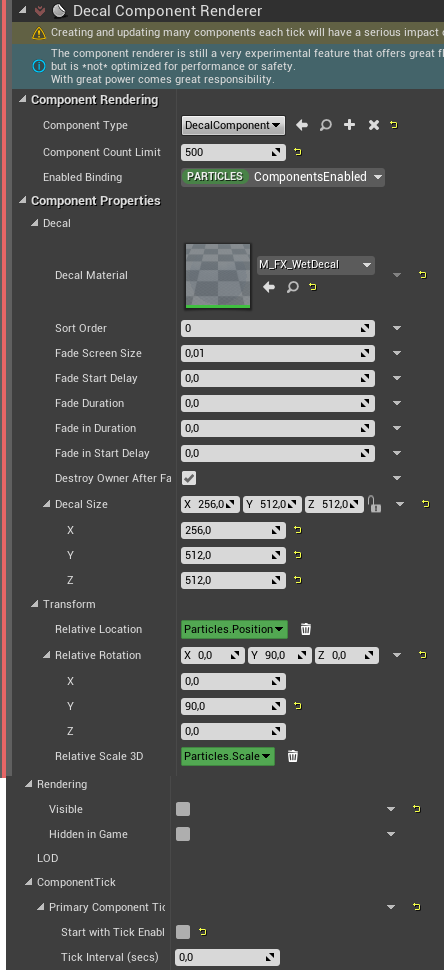
Decal Component Renderer
And here’s our “wet” decal. We had issues with spawning them but those settings are working for us.
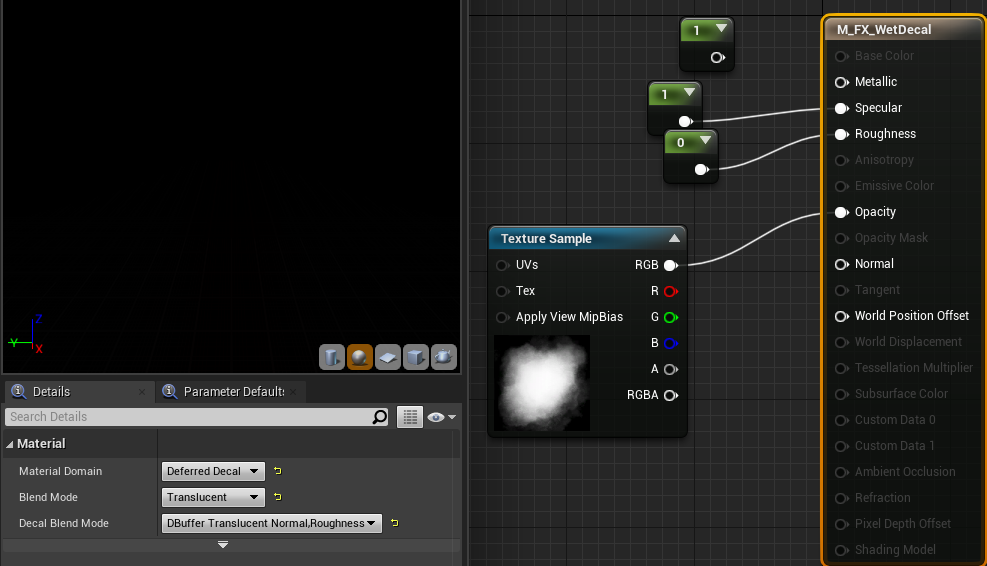
Here’s the material. The opacity mask can be better and basically whole material can be better. It’s there just for the tutorial.
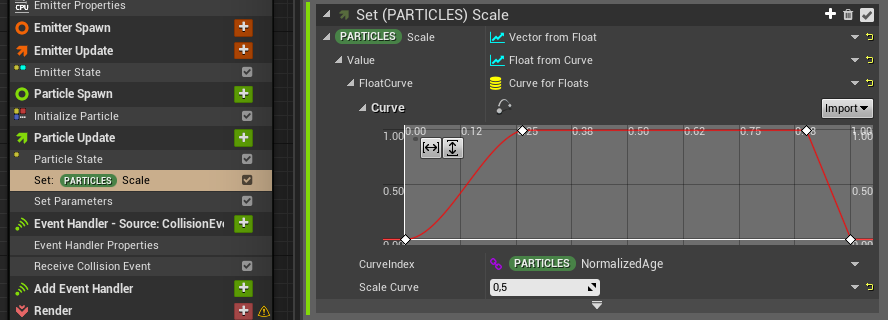
Scaling The Decal
Scaling the decal is different than scaling a sprite or a mesh emitter. If you check our Decal Component Renderer you can find Relative Scale 3d pointed to Particles.Scale. It means if you want to scale it you need to change Particles.Scale parameter.
If you want to change existing parameter you need to add a “Set new or existing parameter directly” Module.
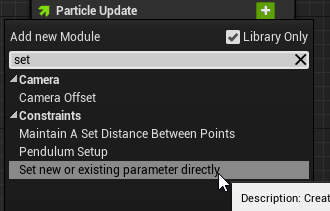
Then if you click the “+” button you can choose which parameter you want to change. For our example it’s Particles.Scale which we are scaling up and down depending on age.
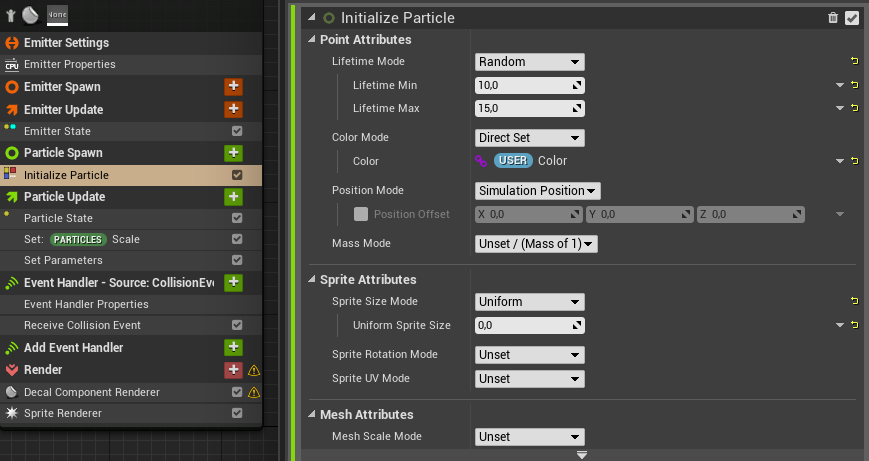
Initialize Particle
Here we are using random lifetime and system color parameter.
And that’s it – now you should see your “wet” decals affecting the world.
This isn’t the optimal approach. What you can do is to create a Wetness parameter on your master materials and increase it when it’s raining. Spawning a lot of decals isn’t optimal and should be used only in cinematics.
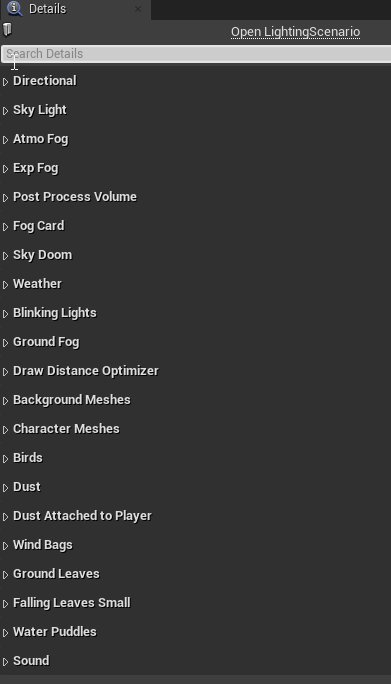
Activating
Our game has something called Lighting Scenario which is responsible for a lot of things:
We don’t want to go with the details in this tutorial but hopefully, we will have time to show you how it’s working and make a tutorial on how we did it and why.
In our case Lighting Scenario is responsible for the weather. Artists can create a scenario with rain, lighting, fogs, etc and they can be changed during runtime on each level.
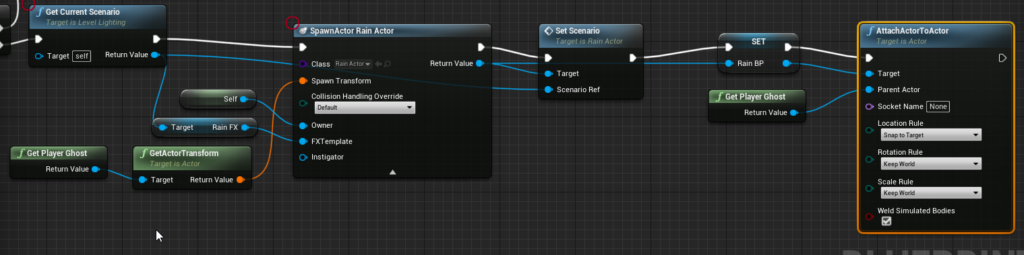
So you need to have some manager which is able to enable/disable rain. In our case, it’s Level Lighting Actor.
Attaching to player
The rain itself is an Actor with a Niagara system and an Audio (rain sound) system attached. Level Lighting Actor (the manager) is spawning it when the rain should be enabled. And deactivating it when it’s enabled and it’s not raining. Simple as that.
The most important part here is to attach Rain Actor to the player on first enabling.
Improvements
CPU Trace only on spawn
We were trying to create a custom module that will do the trace only on the first frames and then just compute the distance to call the collision event but at this stage (4.26) the collisions in Niagara aren’t well documented yet. This will be a major performance impact when ready. Hope we will update this tutorial when we manage to create a custom module for the collision and events here.
Wind Support
Wind can be easily done by a global Wind module that will use System parameters. Your game needs to have a wind manager that will speak with the rain particle and set the wind direction and intensity.
Spawn Splashes using Global Distance Field
Collision is not cheap and in most cases, you shouldn’t use it. Another thing is no one will see that splat is in the perfect spot of the drop. You can spawn splashes using Distance Field (if you are using them) instead of collision events. To do that go back to your splashes emitter.
Change it from CPU to GPU.
Delete Collision events. Then add Spawn Rate Module.
Add Box Location Module to spawn the particles in random spots.
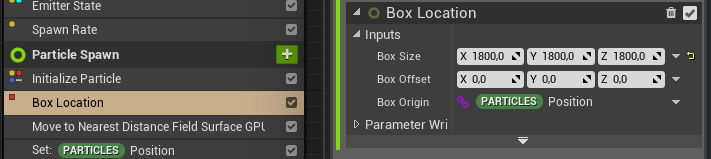
Then use Move To Nearest Distance Field Surface GPU Module. Which will move randomly spawned particles to the nearest DF location.
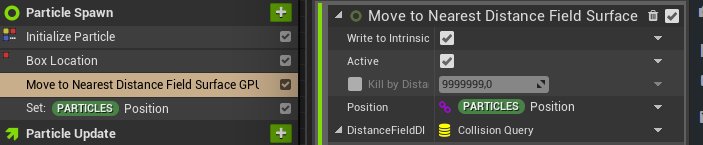
Then you can offset the position on Z as we did.

Thanks to this entire System can be GPU type which is much faster than the CPU one. And it won’t have collisions.
Performance
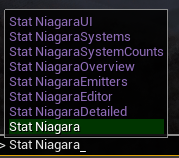
Always try to use “Stat Niagara*” commands to check actual particles’ impact.
You will see that CPU collisions are costly. Spawn count and box location need to be tweaked to make sure you are within the CPU budget.
If your game doesn’t need splashes you can disable collision and other emitters. And then make the raindrops GPU-based emitter, which is much faster than CPU.
And – be aware that the decals will break your game, they are here just for showing you how to work with components in Niagara. It’s an experimental feature.